What is Ambilight? It’s just a marketing term used by the Philips brand that describes extra RGB illumination near and/or behind the television that matches the color of what is displayed on the screen. I wouldn’t say it’s an immersive effect, but it is stunningly pleasing to the eye and removes the sharp contrast of a bright screen in a dark room.
Preface
I’ve had a desire to configure Ambilight on my living room television for several years. I’ve seen others with the moody backlighting behind their television, and started researching what I’d need to accomplish this. I currently have two LG WebOS televisions. One for the living room, and one for the master bedroom. I utilize Home Assistant for automation, and the majority of my lights are from Phillips Hue. Realizing that my only options were a $300 Phillips Hue Sync Box, or a Raspberry Pi running Hyperbian (Raspberry Pi OS comprised of Hyperion-NG), I threw up my arms. Not because of the price, but mainly for the fact that I don’t want extra devices and cables dangling around my TV.
The priority for my entertainment center is cleanliness over ambient lighting. A Phillips Hue Sync Box and the Raspberry Pi options would both require complicating the HDMI feed to the TV from my audio AMP by splitting the HDMI connection. I’d also have to find a way to hide all these extra components and tuck them neatly behind the TV. Ultimately, the sync box forces you to have more clutter, kills your modern 4K 120hz console experience, and can be annoying if you’re using an AMP.
Recently I discovered there were several methods to obtain root access on most WebOS Televisions. With your WebOS tv rooted, you are able to install a homebrew app which grants you access to a list of third party apps that can be installed. Notably the list includes “Hyperion.NG”, “HyperHDR”, and “PicCap - Hyperion Sender App”.
HyperHDR is simply a fork of Hyperion.NG. They both perform the same task of receiving a display input from somewhere and analyze the incoming stream to map a configured group of lighting to matching colors. The choice between these two apps is a matter of preference, they each have their own quirks. PicCap grabs the image displayed on the tv, and downsamples then ships the downsized feed to Hyperion. This can be configured to direct the feed to a local Hyperion installation on the TV, or a Hyperion installation elsewhere on the network.
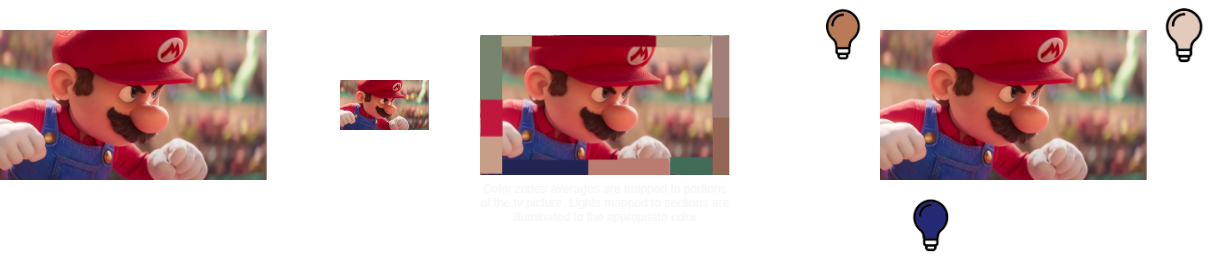 The overall process looks like this
In this post, for the sake of brevity, I’m going to cover the installation of PicCap/Hyperion to the TV. The benefit to installing this on the TV instead of a separate computer is response time. The drawback for myself is within Homeassistant, the switches to toggle Ambilight enter an unavailable status when the TV is turned off. When the TV is turned on, the Ambilight is enabled which may not be desired. In my environment, I mitigated this by installing HyperHDR on a separate server instead. This way it’s state isn’t tied to the TV’s power status. PicCap just ships the imaging data from the TV to my server. Ambilight will remain off unless some conditions are met. For example: When the sun is down, and a movie is playing, or xbox is on.
Following this guide will yield an LG TV with an Ambilight software built in that doesn’t require any 3rd party devices cluttering your entertainment center. Be forewarned that rooting your television is done at your own risk, and I’m not responsible should anything go awry. This could void your warranty should the unlikely event that something goes wrong, so tread carefully.
Here is an example from my setup
Prerequisites
- LG WebOS based TV preferably wired with ethernet
- Philips Hue hub and lights (There are many options for different types of lights but my guide is for Hue)
Determine your WebOS version
Note: The TV’s firmware version and WebOS version are not the same thing.
The WebOS version determines what method is required for you to obtain root access to the TV
Depending on your version of WebOS, the menu path to find your WebOS version may be different from mine. My TV is running on WebOS 6.3.3, and I was able to determine this by going to the settings menu > All Settings > General > Devices > TV Management > TV Information. This brings up a menu that shows important details including the WebOS version.
Root your WebOS TV
There are two primary methods:
When you search for instructions on how to root WebOS, you’re only going to find the Rootmy.tv method found here [Github]. This method is dead simple and will work for most WebOS versions up until 2022 when LG patched the vulnerability that allowed the exploit. If you have auto updates enabled, or have manually updated WebOS since then, then this method may not work for you, although it doesn’t hurt to try.
Rootmy.tv did not work for me as WebOS 6.3.3 contained a fix for this method. There is also a more involved method that involves creating an LG developer account, and installing the developer mode app from the LG app store. With this app you’re able to temporarily side load applications. This itself doesn’t provide root access required for Hyperion-NG, but does open the door enough for you to run some commands that will grant root access.
The alternate method is this “crashd” exploit. The comprehensive exploit guide is detailed here: [Gist.Github].
I followed this process to a tee, and was able to achieve root. This should work for all newer TVs with WebOS later than 4.0 as of this publication. My only hiccup was that I couldn’t get past step 6 by simply powering the TV off with Quickstart+ disabled. For each reboot action, I had to unplug my TV, and plug it back in. It’s mentioned in the guide that this may be required for OLED TVs. Just about every problem you could have is mentioned here, albeit you may have to browse around to find it.
Both of these methods install the homebrew channel automatically.
Installing Hyperion-NG/HyperHDR on your rooted TV
Now that you have a WebOS TV rooted with the homebrew channel. You simply go to your TVs app menu, and scroll to the end of the list where you’ll find the newly installed Homebrew Channel.
Open the Homebrew Channel, and you can install:
- Hyperion-NG or HyperHDR
- PicCap
I had some issues with setting the default password on Hyperion, so I recommend HyperHDR. HyperHDR supposedly has improved performance due to being multi-threaded. also I noticed HyperHDR provides a clear indication that it works with Phillips Hue v2 API which allows for control of gradient light strips. Hyperion may as well, but it doesn’t have a separate option that makes this clear.
After you install each app, you will find them at the end of the app list in the same place you find the homebrew channel.
- Open PicCap and enable it. Note there is a settings menu if you wish to configure PicCap to ship to an external Hyperion install. I had to enable mine a couple times initially but haven’t had to mess with it since.
- Exit PicCap
- Open Hyperion and start the daemon. Also enable autostart.
- Exit Hyperion
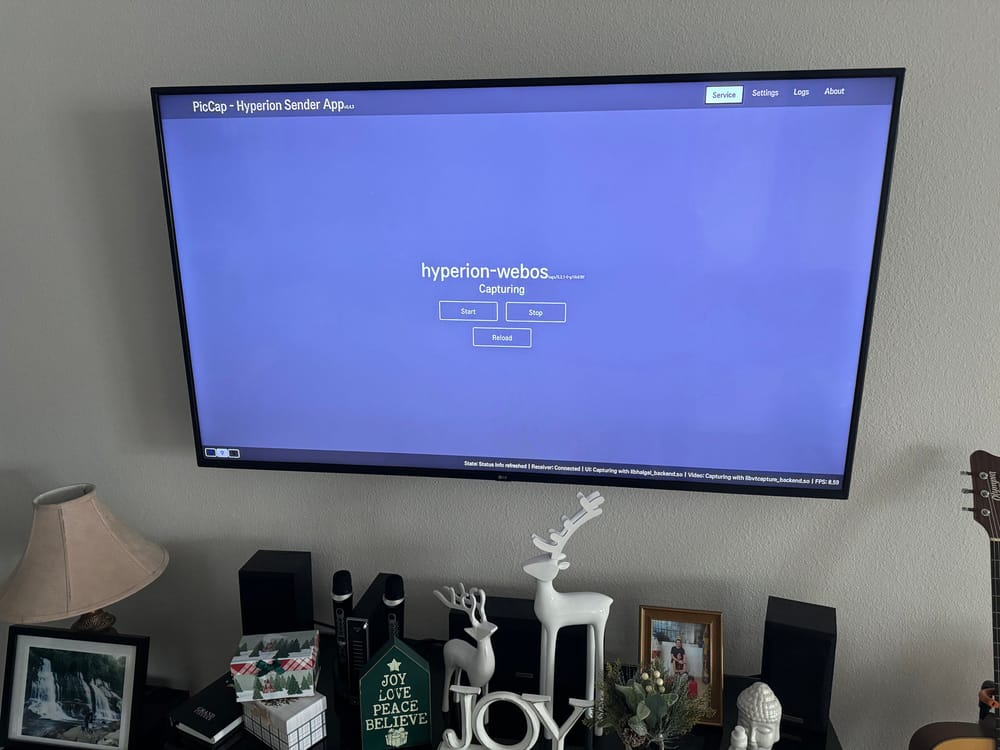 PicCap running on WebOS TV
Configuring Hyperion for Phillips Hue Entertainment Zones
The Hyperion/HyperHDR web interface listens on port 8090 by default. So navigate in a browser to http://[TV IP address]:8090 to get to the web UI. It immediately presents you with a nag to change the default password. Go ahead and do that and make sure you can log in again with that password. I had an issue with Hyperion where it didn’t like a symbol in my password, and thus could never log in again without deleting the Hyperion database file from the TV to start over again.
The next step is to pre-configure your entertainment zone within the Phillips Hue app on your phone. This is done by opening the app, and going to the settings tab. Select “Entertainment Areas” and create a zone containing a group of lights to be controlled by the TV. You can configure their placement, but I’ll be honest I’m not sure their placement setting matters since you map lights to portions of the screen in Hyperion.
Once you’re ready, head back to the Hyperion/HyperHDR web interface and select the “LED Hardware” menu.
Add a new controller and select “philipshue” from the controller type list.
Click the “Philips Hue Entertainment Wizard” button which will walk you through connecting your Hyperion instance to Philips Hue Hub and mapping the lights to specific portions of the TV.
After configuring the Hue, you have some options you will want to look at for personal preference. Primarily the “Restore lights’ original state when disabled option.
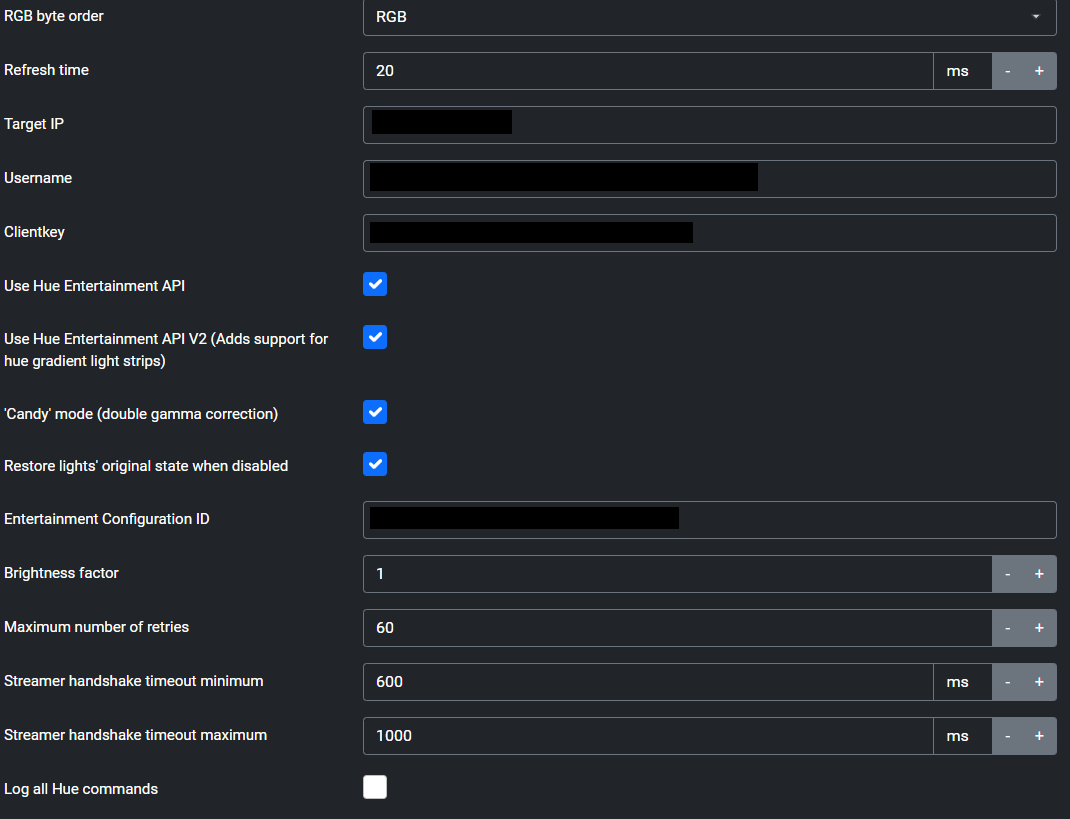 Available PhilipsHue configuration options
You can enable/disable the Ambient Lighting functionality by navigating to the Overview tab in Hyperion. On HyperHDR they placed these settings in the “Remote Control” tab. Disabling HDR will disable Ambient light features entirely. Although you may choose to disable functions individually.
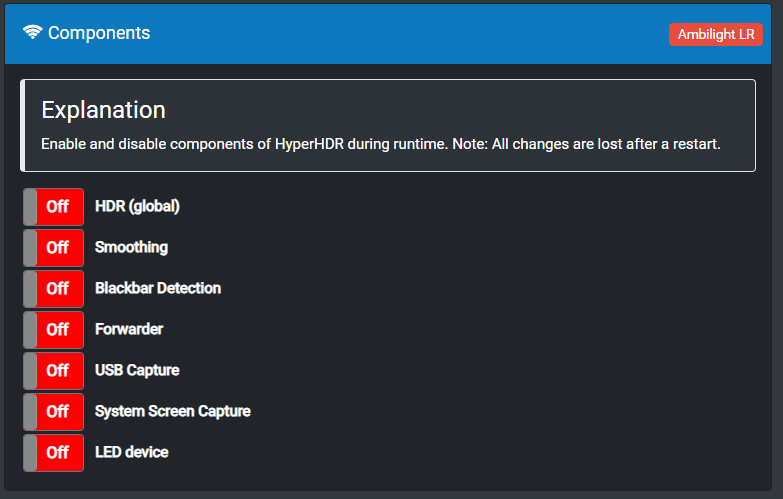 Switches available in HyperHDR and Hyperion-NG
If you are using Homeassisstant, there is an included Hyperion integration that, once added, provides all these switches. You can create automations that will enable HDR globally for specific conditions, like when a media player has a “playing” status. At the least, you can place a switch on your dashboard to enable/disable ambient lighting.
The Hyperion integration does not work properly for HyperHDR. It has it’s own separate integration that has to be added from HACS by adding a specific repo found here.
This article should have left you with a rooted WebOS TV that has Hyperion/PicCap installed, and configured for your Phillips Hue entertainment zones.