If you have spent any time automating your domicile, you may have acquired a MyQ based garage door opener that was manufactured by Chaimberland, Liftmaster, or Merlin. Perhaps, like myself, you signed a mortgage on a home that included one or more of these MyQ openers. You were probably excited with the ability to create automations revolving around the use of garage entrance into your home.
There are many great home automation platforms. I’ve used Homeassistant for the better part of six years. I’ve found the features and add-ons to be comprehensive, and backed by a bustling community that’s always available to answer complex questions. I discovered the built-in NodeRed add on as well, which I find to be superior to the built in automation of Homeassistant. So I was excited to move into my new home, especially after noticing the MyQ logo on my new pre-installed garage door openers.
I’ve never had the desire to automate the actual opening or closing of my garage doors for safety reasons. I don’t want my garage door opening at 3AM by mistake because of some unexpected condition, or I fat fingered some logic. However, I do have the need for:
- Audible and visual notifications based on garage door events
- Turn on the exterior and interior garage lights while a garage door is not closed and the sun is down
- Alerts if a garage door is left open
I had this configured and working in my home for an entire year with mostly no issue using the available MyQ cloud integration. Until September.
Error 429 Rate Limited
Around September 2023, I noticed that my garage doors were in an unavailable status. The integration was displaying a 429 error whenever I tried to reload it. Universally, this error code means that the request has been denied because you’ve hit an API too many times. A quick trip to the github issues page for the MyQ Home Assistant integration saw other enthusiasts engaged on the issue. MyQ had been plaguing the home automation community with many subtle API changes that would break the integration. At first glance this just required another small tweak to get the integration working again. This time, however, was no simple API bungle. Cloudflare AI bot protection was now activated and blocking any potential fingerprinted bot hits against their API. This made the game of cat/mouse with the API unfeasible.
The MyQ experience
One of the primary reasons for our endeavor is to centralize all our smart home magic into one app instead of constantly sifting through an app salad confusingly fragmented all over our devices. The MyQ app was also highly lacking in features and automation capability. You could schedule the door to open or close at a certain time. And that’s about it. To which I had no need for.
By merit of you reading my post, you’ve probably already seen the menagerie of articles from all the tech sites shaming MyQ. With this new reality in place, users were finding that they were temporarily forced into using MyQ’s poorly conceived app. Opening the app was an exercise in patience as it takes a while to load your account. When it does finally load, the first thing that happens, is you get slapped in the face with a giant Amazon/Walmart ad that conquers the whole screen. Once you bypass the ad, then you are finally approved by MyQ to close your garage door.
Another problem with the modern Chaimberland ecosystem, is they utilize a technology called “Security+2.0”. The garage door wireless remotes for years have used a rolling code system to thwart replay attacks. Since the code changes with each press, one can’t simply listen to the sub-ghz airwaves for garage button presses, and repeat the signal to gain entry into a victim’s home. Security+ takes this technology a step further and implements rolling codes into the wall buttons with a clever serial connection that sends all the data over 1 wire. I can’t perceive any real intention behind this marketing gimmick besides making their ecosystem completely proprietary to Chaimberland accessories. With Chaimberland being purchased by Blackstone 2 years prior, all this is starting to make sense. Everything Blackstone touches quickly turns into an anti-consumer mess.
Many people bought into MyQ because it was initially homekit compatible, and at one time had google home capabilities. This gradually faded into the sunset. MyQ is now trying to charge a separate subscription fee for different basic features, such as Apple Carplay integration for specific vehicles. You would be able to create this for free if it were still homekit capable, which again explains why they are removing these features in favor of subscription fees.
What a slimy move.
MyQ made a public statement regarding their decision to block all 3rd party access to their API citing the Homeassistant community of effectively DDoSing their cloud infrastructure with constant polling requests. While it can be entertained, this is an odd excuse considering the Home Assistant developers reached out to Chaimberland many times in an attempt to form a partnership. Chaimberland ignored the requests and instead pointed their customers in the direction of the “Approved Partners” page. As of this publication, their partners list consists of the following:
- Walmart+ InHome
- Vivint
- Alarm.com
- Resideo
- Ring
- IFTTT
- AcuraLink
- HondaLink
- Mercedes-Benz
- My Mitsubishi Connect
- Tesla
- Steer Tech
- Volkswagen
These are all subscription integrations except for Ring and IFTTT. Integrating MyQ with Ring does nothing more than proxy the virtual garage door buttons through the Ring app, which is useless and fundamentally worse than the MyQ app. Plus we all know Ring makes money by selling your data. IFTTT only allows 2 automations without a subscription. The way IFTTT works, one action burns one automation, so to open / close one garage door would burn both automations, right? Wrong. IFTTT only allows you to close a MyQ garage door, not open it. Also it was noted that MyQ’s integration with IFTTT completely broke during this whole shit show.
In short time, Homeassistant announced that it was removing the MyQ integration from the official integrations in an update.
So what now?
In interim, many users had devised all sorts of different contraptions and rube-goldberg device workarounds to circumvent this issue. Many users were using different types of smart relays to short the contacts within the wall button so it would then send the rolling code to the garage door opener. The Meross is a highly acclaimed example. Others would solder a smart relay to an extra wireless opener. While all of these solutions worked, they were not particularly elegant solutions as they require wiring and mounting a sensor to the garage door itself. The other problem with these solutions is you only get the ability to toggle the garage door and then using a separate sensor to determine if it’s open or closed. Some were purchasing the official MyQ Homekit bridge. While MyQ at one time sold a Homekit bridge, it’s long been discontinued. You can find it on ebay for a high price, but even then, they could kill it off at any moment. Plus it keeps you dependent on the MyQ cloud.
Enter RatGDO by Paul Wieland
“Roger’s Tech Talk” channel hosted an interview with Paul Weiland in this youtube video:
With impeccable timing, Paul had created this RatGDO (Rage against the Garage Door Opener) months prior to this fiasco with the primary purpose of providing local network control of his garage door openers. He managed to find a way to generate rolling codes without copying MyQ’s code. The RatGDO is wired up directly to a security+2.0 garage door opener with 3 wires and it is able to communicate directly with the motor. The motor itself maintains all sorts of useful data about the state of the garage door, and the RatGDO is able to snatch every morsel of it for home automation.
- garage door state (open, opening, closing, closed)
- garage door position (e.g. 50%)
- obstruction sensor status (blocked or clear)
- light status (on / off)
- wireless remotes enabled/disabled
- You’re able to send commands to
open/close the garage door open garage to a % toggle the lights toggle the wireless remotes (with some extra configuration) With a RatGDO and 3 wires you u can wire this to your garage door, and tuck it into the light dome without the need for any other sensors. I purchased 2 of these and suffered a 3 week backorder. My time was spent discovering that the MyQ garage doors send MQTTS traffic to the MyQ cloud. I made many fruitless attempts to poison the ARP of my own network and route that traffic through MITMproxy and IOxy to strip SSL and send the raw MQTT to my MQTT server running on home assistant.
Installation
The instructions on Paul Weiland’s site are sufficient for loading the firmware onto your fresh RatGDO. Make sure you’re using a proper usb cable, as many usb type-b cables included with other tech, only pass a charge. Follow the steps to configure the name, WiFi, MQTT of your Homeassistant server, and reboot. I set my MQTT Topic Prefix to “ratgdo/” (without quotes). If you do the same it’ll save you some time following my configuration of the wireless remotes. Once rebooted, you should already see your RatGDO device appear on the /config/devices/dashboard page.
The wiring guide is also sufficient but it may seem like you have to splice wires which is not the case. The entire right side of the board is irrelevant unless you need to wire the RatGDO up to a legacy garage door opener.
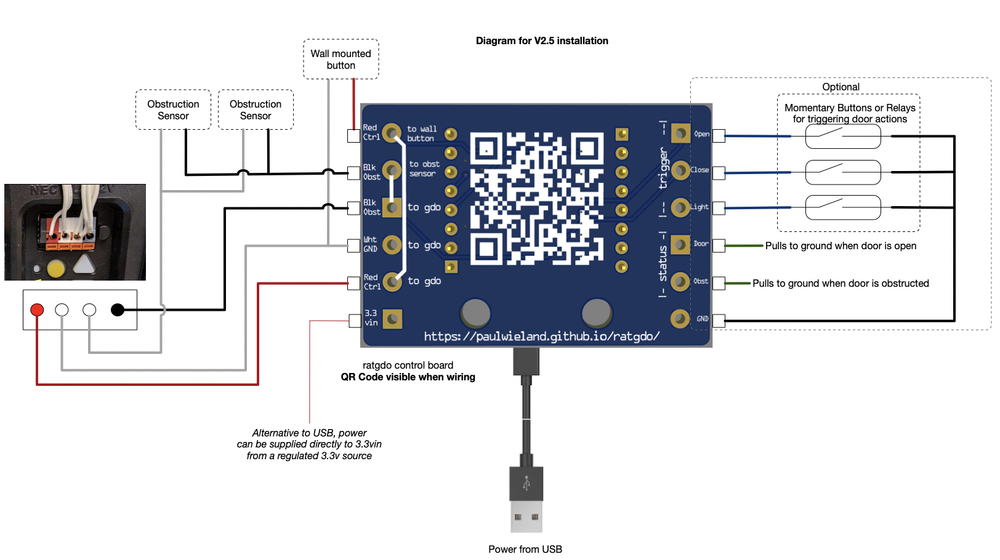 RatGDO wiring diagram
First unplug your garage door. As long as you’re only powering the RatGDO from a USB brick, You only need 3 separate thin 24 gauge solid core wires which Paul provides if you purchase the purchase the ratgdo v2.5 control board with installation kit for $44. All you need to connect them to are the 3 ports labeled “to gdo” on the left side of the diagram. The black obstruction wire, white ground wire, and red control wire. Then you just stuff the other side of the wires into the corresponding colored port on the garage door. Plug your garage door back in. Easy Peasy.
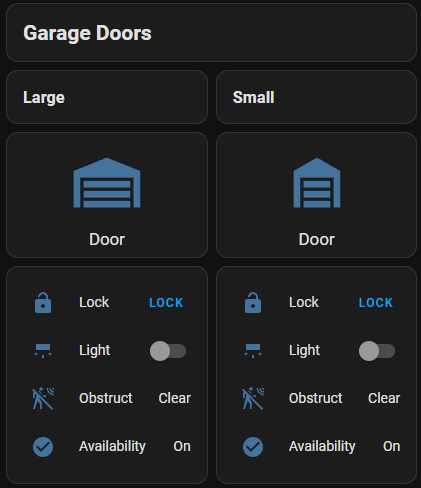 Homeassistant configured entities
You should see the RatGDO become available again in Home Assistant and you should be able to control it now. Everything was fairly cut and dry for this process but I’m going to delve into some further configuration I had to go through to get the “wireless remote disable” feature to work right.
Homeassistant configured entities
You should see the RatGDO become available again in Home Assistant and you should be able to control it now. Everything was fairly cut and dry for this process but I’m going to delve into some further configuration I had to go through to get the “wireless remote disable” feature to work right.
Paul purposely configured the RatGDO to not publish this MQTT topic to Homeassistant. His logic is that it’s published by the garage door as a lock entity. The wall button even says “lock”, but this isn’t a lock. The “lock” feature on these garage doors simply disables the wireless remotes. He did not want people thinking this was a security feature. This is still a useful feature for someone like me where my wife uses her side of the garage for projects. She occasionally parks outside with her remote in the car, which means someone can smash the car window to gain easy entry into the house.
Wireless Remote Toggle Configuration The documentation on MQTT YAML configuration on Homeassistant leaves a little bit to be desired. I initially came across a YAML example for one garage door, but it had zero context on where to place the YAML or why. The YAML goes into your Homeassistant’s configuration.yaml file. The configuration.yaml is typically located at config/configuration.yaml. Depending on your configuration, it might be different. To determine where yours is located, go to the HomeAssistant config > system > repairs page, and click the hamburger menu in the top right. From that drop down menu, select “System Information”. The first block will show you which folder your configuration.yaml is located in the “Configuration Directory” field.
Here is that initial 1 GDO example:
mqtt:
  lock:
    name: GarageDoor
    availability_topic: "ratgdo/GarageDoor/status/availability"
    command_topic: "ratgdo/GarageDoor/command/lock"
    state_topic: "ratgdo/GarageDoor/status/lock"
    payload_lock: "lock"
    payload_unlock: "unlock"
    state_locked: "locked"
    state_unlocked: "unlocked"
  binary_sensor:
    name: GarageDoor Availability
    state_topic: "ratgdo/GarageDoor/status/availability"
    payload_on: "online"
    payload_off: "offline"
MQTT configuration.yaml single garage door example
I’m using 2 GDOs so I had to some make some syntax tweaks to make two lists. The online documentation for this was sparse so I just included both.
Here was my YAML for my two doors.
mqtt:
  lock:
    - name: large_garage Lock
      availability_topic: "ratgdo/large_garage/status/availability"
      command_topic: "ratgdo/large_garage/command/lock"
      state_topic: "ratgdo/large_garage/status/lock"
      payload_lock: "lock"
      payload_unlock: "unlock"
      state_locked: "locked"
      state_unlocked: "unlocked"
    - name: small_garage Lock
      availability_topic: "ratgdo/small_garage/status/availability"
      command_topic: "ratgdo/small_garage/command/lock"
      state_topic: "ratgdo/small_garage/status/lock"
      payload_lock: "lock"
      payload_unlock: "unlock"
      state_locked: "locked"
      state_unlocked: "unlocked"
  binary_sensor:
    - name: large_garage Availability
      state_topic: "ratgdo/large_garage/status/availability"
      payload_on: "online"
      payload_off: "offline"
    - name: small_garage Availability
      state_topic: "ratgdo/small_garage/status/availability"
      payload_on: "online"
      payload_off: "offline"
MQTT configuration.yaml two garage door example
You can’t just paste this into your configuration.yaml unless you set your MQTT topic prefix on your RatGDO config to “ratgdo/” and the name of the two doors are “small_garage” and “large_garage” like I did earlier. The MQTT topic prefix is just the first part of any of the state_topic lines, e.g. “ratgdo/large_garage/status/availability”. If you didn’t use “ratgdo/” then otherwise just adjust the names and MQTT prefix in the topics above to match what you configured for your RatGDO(s). If you need to see what your topics actually look like on your network, there is a way to view it in HomeAssistant. However, I think MQTT Explorer gives you a better global view of the topics that are bouncing around on your MQTT network. So you can get an idea of what the topics in your YAML need to look like and why. It’s nice to do anyway just to see what your MQTT mesh looks like.
Once you’ve made your change, be sure to save the file. Then Reboot home assistant. It won’t be immediately obvious the new entities are there. They aren’t directly attached to the RatGDO devices, nor is there any Homeassistant notification that they were detected. They appear as their own separate entities, so you will need to search for them.
Hey neat! Now I can disable my garage door remotes whenever the Alarmo integration is armed!
For the future The Home Automation community is a fantastic one. Whenever challenges like this arise, they will always conquer them.
There is a lesson in here for all of us. If you’ve integrated smarthome kit into your environment that has cloud only control, treat it like you’ll lose control of it at any moment. Home Assistant provides a small warning for any integrations you’re using that only allow cloud control so you can easily determine risky integrations that could be dirty and pull a MyQ on you at anytime.
 “Depends on the cloud” disclaimer as seen within homeassistant